
DNA Replication
This Jmol Exploration was created using the Jmol Exploration Webpage Creator from the MSOE Center for BioMolecular Modeling.
No molecular structure has gained world-wide notoriety more than the double helical structure of DNA. The famous Nature paper written by James Watson and Francis Crick in 1953 entitled, 'Molecular Structure of Nucleic Acids' ends with the statement, 'It has not escaped our notice that the specific pairing we have postulated immediately suggests a possible copying mechanism for the genetic material.' Since the release of the paper, the focus of the research of a number of scientists has been on elucidating the mechanism of DNA replication.
In this activity you will learn how a copy of DNA is replicated prior to cell division. If you have access to the models, you will work with them to complete the activity. Otherwise, the images and videos in the activity will guide you. If you are working with models, your instructor will indicate whether you will work alone or in groups.
This icon indicates you are to provide a response. You may enter your response in the activity, then download a file with your answers at the end of the tutorial. Alternately, you may download and print a paper copy of the worksheet. Question numbers are included to allow you to easily transition from the tutorial to the worksheet.
In exploring DNA structure, you used accurate representations of the molecular structure of DNA. Here we will use schematic models to better represent a process (DNA replication). To better understand how the two models relate, examine the image below.
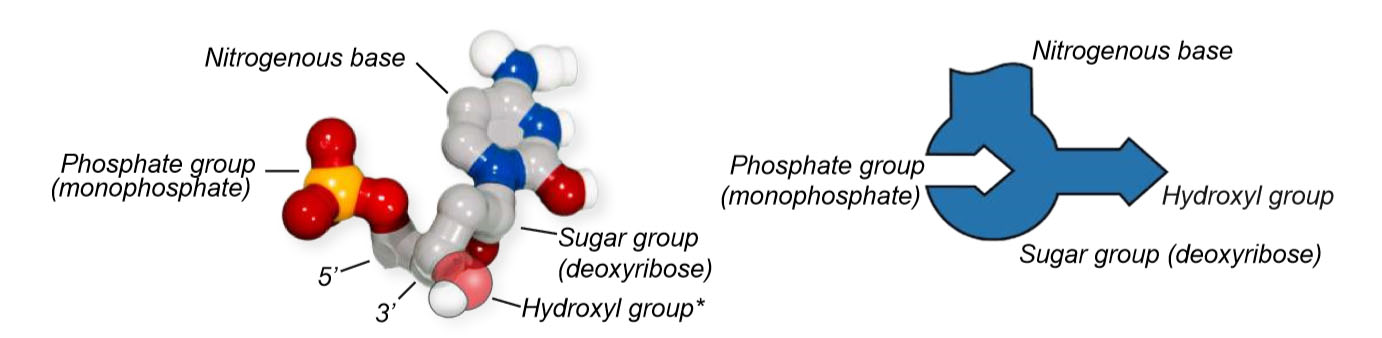
Note that in this model, the phosphate group is represented by a hole rather than a structure. This is to allow the nucleotides to connect in a chain.
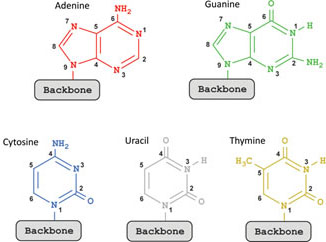
Throughout this activity, deoxynucleotides have a rounded base (ribonucleotides have a square base) and are colored as follows:

As with the accurate physical models, purines (A and G) pair with pyrimidines (T and C), and the models only allow for correct base pairing.
In this lesson you will learn how a copy of DNA is replicated prior to cell division. If you have access to the models, you will work with them to complete the activity. Otherwise, you may work with the images and videos below to work through the activity and complete the worksheet. If you are working with models, your instructor will indicate whether you will work alone or in groups.
Assemble one strand of the DNA sequence according to the pattern below. Make sure the pieces are oriented with rounded portion of the nucleotide facing down and the 3' hydroxyl group pointing to the right.

This template is also illustrated on your worksheet.
Make a complementary strand of DNA above the bottom strand. Base pair nucleotides to the bottom strand you created in Step 1 to create a double stranded DNA model.
1. Record the paired nucleotide sequences in the space below.
2. Examine the strands of DNA. What do you notice about the ends of the model?
Examine the diagrams below.
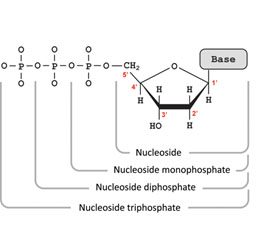
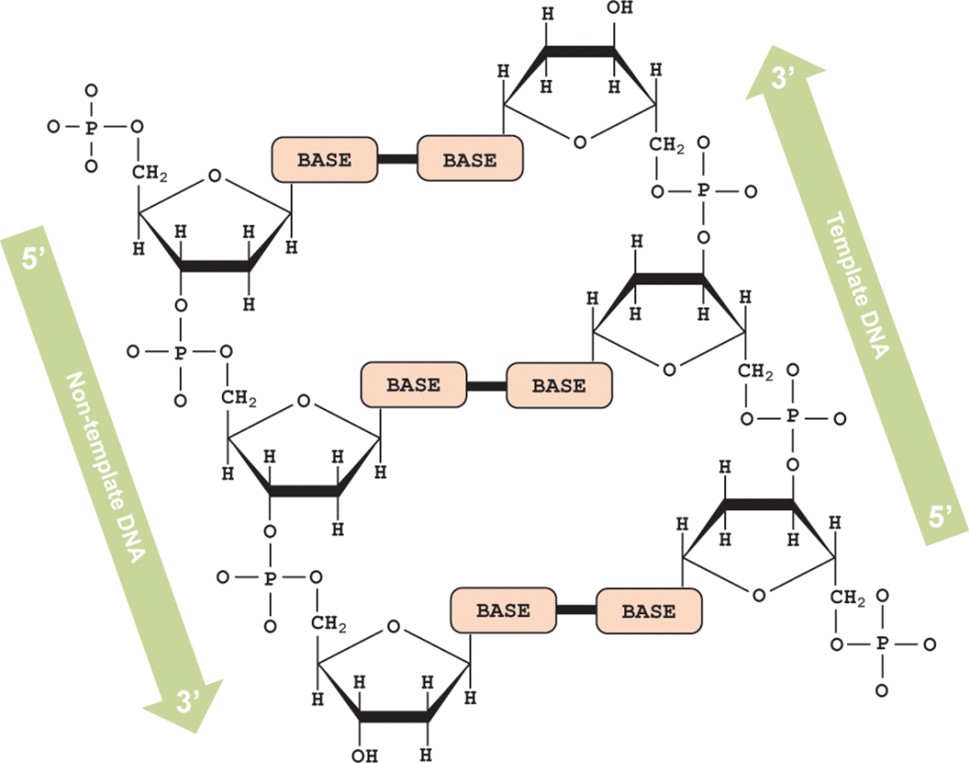
Prime symbols (') are used in the numbering of the carbons on the sugar portion of the nucleotide to distinguish them from the nitrogen base carbons.
3. Find and label the 3' carbon and the 5' carbon in the DNA nucleotide shown in the diagram below.
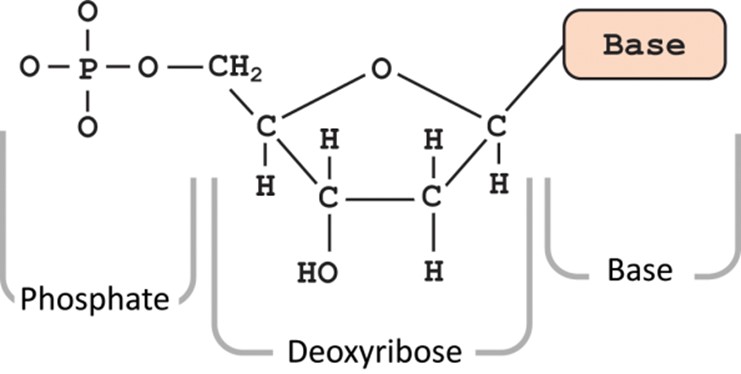
4. How are the 3' and 5' carbons oriented in the strands of the DNA molecule you assembled?
Double stranded DNA is composed of two anti-parallel strands! Each DNA strand has 'directionality'. The two sugar-phosphate backbones run in opposite 5' → 3' directions from each other. It is important to keep this directionality in mind as you model the process of DNA replication.
5. Circle the 3' carbons and draw triangles around the 5' carbons in the DNA molecule above.
6. What group is attached to the 3' carbon?
7. What group is attached to the 5' carbon?
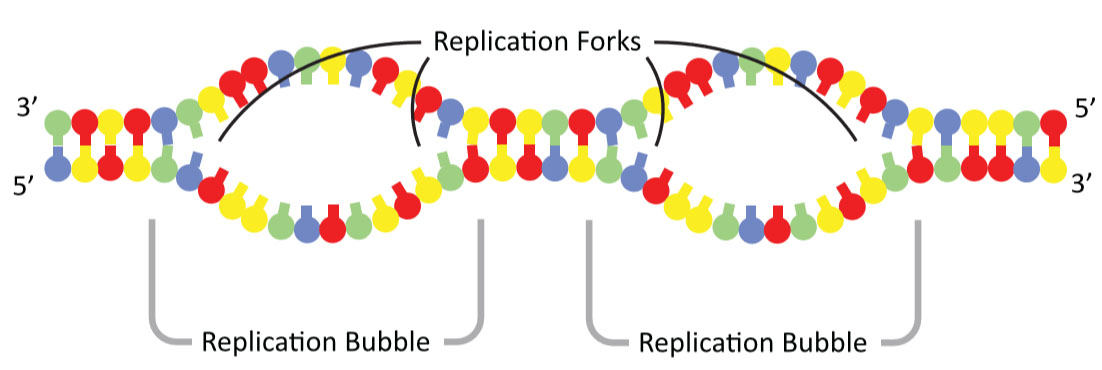
Replication of DNA begins at specific sites referred to as origins of replication. A eukaryotic chromosome may have hundreds or even a few thousand replication origins. Proteins that start DNA replication attach to the DNA and separate the two strands creating a replication 'bubble'. At each end of the replication bubble is a Y-shaped region where the parental strands of DNA are being unwound. This region is referred to as the replication fork.
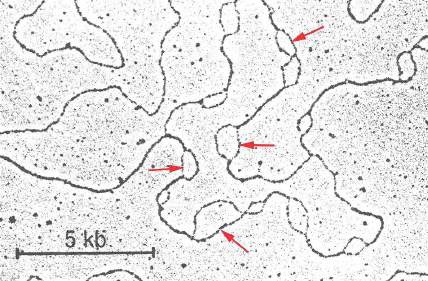
Below is an electron micrograph showing multiple replication bubbles on a chromosome."
8. Where does DNA replication begin on the chromosome?
9. What must happen to the DNA for replication to begin?
Note: Replication occurs on both sides of the replication bubble (at each replication fork). For simplicity and clarity you will simulate replication on only one side of the bubble, at a single replication fork.
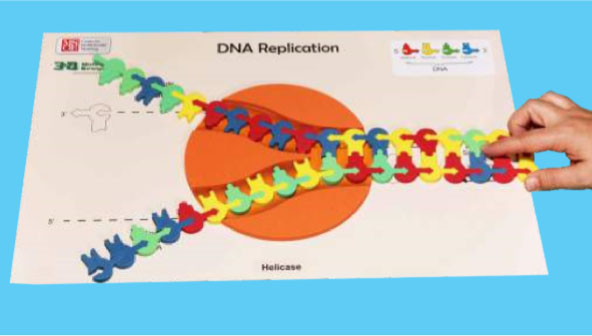
Before DNA can be replicated, it has to be unwound, and the hydrogen bonds between bonds must be separated. Although a number of proteins are involved in this process, we will only explore a simplified version. Helicase is involved in separating the two DNA strands. Below are two Jmol buttons that explore the actual structure of DNA helicase from E. coli (PDB ID: 4esv). Much of our understanding of DNA replication was first determined with bacterial proteins, which are typically easier to study. This is a very large protein, so it will take a few seconds to load. Shown are a backbone model so you can see the shape of the protein, as well as a space fill model to see the overall shape of the protein. DNA helicase is a hexamer (displayed in pastel colors) and the DNA is shown in a bright blue.
DNA helicase backbone PDB ID: 4esvYou will model one side of the replication fork. Begin the process of DNA replication by feeding the strands of the constructed DNA into the top of the helicase enzyme on the replication mat. Be sure to follow the directionality of the DNA indicated as you position your molecule. Continue feeding the DNA through the enzyme until you have 11 bases emerging from the bottom of the helicase. Notice that helicase moves into the replication fork NOT away from it.
10. What does the helicase appear to be doing?
DNA polymerase catalyzes the synthesis of new DNA by adding nucleotides to a preexisting chain. There are multiple DNA polymerases, even within a single species. Shown here is human DNA Polymerase beta (PolB) from 1zqa.pdb. Although this polymerase is involved in repair of DNA rather than DNA replication, it, like all DNA polymerases, wraps around the DNA molecule (a short segment is shown here in salmon and green). DNA polymerase is yellow.
DNA Polymerase B backbone model PDB ID: 1zqaDNA polymerase catalyzes the synthesis of new DNA by adding nucleotides to a preexisting chain. New DNA can elongate only in the 5' → 3' direction. As a result one of the DNA strands can be synthesized continuously while the other must be made in short 5' → 3' fragments. The DNA strand that is made continuously is referred to as the leading strand.
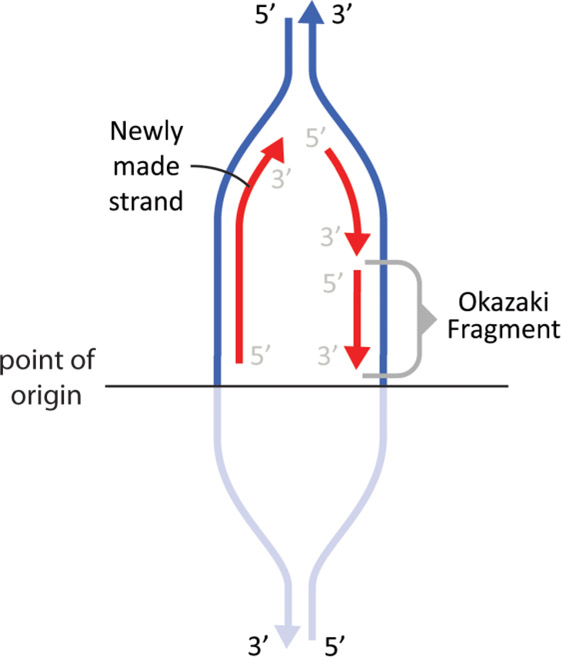
Simulate replication in the leading strand by placing one DNA polymerase at the point of origin (see diagram above) and adding nucleotides in the active site to the parent strand. Continue adding nucleotides as you move the DNA polymerase until you reach the fork.
The 3' OH group is essential for adding a new nucleotide to the growing DNA strand.
11. As a new nucleotide is added to the growing DNA strand, which part of the new nucleotide forms a bond with the 3' OH group on the DNA strand?
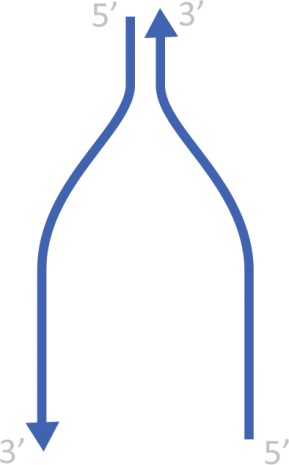
12. The arrows below represent DNA templates. Sketch and indicate the 5' and 3' ends of the newly replicated leading strand of DNA below:
13. You will not be able to synthesize the other strand of DNA in a continuous manner. Explain why not.
Place the second DNA polymerase at the replication fork on the other strand of DNA. Notice that the DNA polymerase must move away from the fork instead of toward the fork as it did in the leading strand. In order to accommodate the 5' → 3' synthesis of DNA, short fragments are made on the second strand referred to as the lagging strand. Continue adding nucleotides in the active site as you move the DNA polymerase away from the fork until you reach the end.
14. The arrows below represent DNA templates. Sketch and include the 5' and 3' ends of the fragments composing the lagging strand of DNA below:
Feed the next eleven nucleotides through the helicase to separate more of the original double stranded DNA. Continue sliding the DNA polymerase along the leading strand, adding more nucleotides as you progress.
The lagging strand requires that you move the DNA polymerase! Place the DNA polymerase back at the fork junction to create the next fragment. Move the DNA polymerase so that the bases may be added from the 5' → 3' direction. You have now created a second fragment of DNA on the lagging strand. These fragments are referred to as Okazaki fragments and are usually 100-200 nucleotides long in eukaryotic cells. "
Creating Okasaki fragments is a bit like sewing a backstitch with a needle and thread – after the first stitch is made, the needle is moved back a bit to create the next stitch and so on.
When you 'bump' into the first fragment, you will need to remove the DNA polymerase and join the two fragments together with the appropriate nucleotide. The actual process of joining the Okazaki fragments together is a bit more complicated and involves several other molecules like DNA Polymerase I and DNA ligase. Also notice that we are not using Primase and RNA primers for lagging strand synthesis.
Complete the process of DNA replication with the remaining 11 nucleotides on both the leading and the lagging strands. DNA replication is considered to be a semi-discontinuous process.
15. Explain why DNA replication is considered to be a semi-discontinuous process.

Examine the two newly synthesized DNA molecules.
16. How do these two new double-stranded DNA molecules compare to the original (parental) double-stranded DNA?
To review the process, view this stop motion video. Note that in the video, newly synthesized strands are in gray.